Tuesday, July 30, 2013

Have You Grokked Lately?


What a weird question, right?  If you've used instaGrok, then you know the answer to this and you can Grok with the best of them.

If this sounds as foreign to you as Klingon, then you have to join us in the world of instaGrok.

This web delivered app is an AMAZING way to help your students get a clearer view of what their research could/should look like.

CCSS plainly states that we are no longer teaching our students to write long, drawn out research papers.  The focus has now changed to "research on the fly."  instaGrok supports such standards and provides students with graphic and well-organized ways to pull research together.

instaGrok has "regular" and "classroom" settings available.  Might I suggest that you try these out to see what works best for you? 

All your students need to do is type in their "big idea."  I chose "cheese."  Then I hit return and instaGrok did all of the "grokking" for me.  My big idea now became the center of a brilliant graphic organizer that I can work with in...editing as needed.  There is also a nifty little "slider" that allows me to choose the level of difficulty/sophistication that I wish to conduct my research.  The great thing about this slider is that, if one of my students is struggling with way too many choices, a single slide allows the teacher AND student to customize the research.  

instaGrok helps provide plenty of ideas for narrowing research down...cheese has subheading of rennet, cheesemaking, curds, gouda and many others.  For less experienced researchers, this feature makes instaGrok especially appealing!

The Grok also brings up photos, videos and other web-based resources and puts them in an easy-to-use format along the left-hand side of the page.  The student can save his/her Grok and can send the teacher or a parent or classmate a link so as to share what they come up with.

I started using this with 4th and 5th grade students last year and my students loved the ease of use and the format.  Organization of research was never easier!  And, as a classroom teacher, conferring with my researchers was a breeze!  Really!

I'm moving my way to 3rd grade in a couple of weeks and I still believe that instaGrok is the way to go.  I can't wait to try it out with my new Minions!

Give instaGrok a try this fall!  You won't be sorry!

Nikki


Monday, July 29, 2013

Monday Made It...Whew!

Happy last Monday in July y'all!  I just spent the last week in New Orleans, Nashville and Memphis and I noticed a ton of signs that advertised school starting on August 1st.  HOLY COW!  I would definitely not be ready for that!  (For all of my southern friends who are starting school on Thursday, my hat's off to you!)

While I'm at it, here's a picture of my son down in the French Quarter.  He's painting a door that is being sent to Nelson Mandela:


It's time to link up with Tara over at 4th Grade Frolics for her...


Yeah...I've been a slacker...but I'm up and running again and wanted to get something done.  I got home from the most AMAZING vacay with my hubs and son on Friday night and then kicked things into high gear just so that I could post today.  (It wasn't too tough being that I could do things in between the MOUNTAINS of laundry!)

Here's what's been happening in my Monday...

Pop Star Reward Bingo

Note...this has been floating around out there for a bit on other blogs and on Pinterest and I've seen a few people try this out.  I'm not sure who to credit for this amazing idea...so whoever you are...thanks!  By the way...I subscribe to the idea that a good teacher is a great thief!


I fell in love with this idea the first time I saw it, so I had to try it!  I've seen it in neon with a black background and with lots of jazzy graphics, but that doesn't fit my "Road Trip" theme this year, so I went with black, white, and blue with some colorful pop bottle caps.  I want to do something else with it to add the "pop," but nothing's jumping out at me just yet, so here is my version.  (You can't see this in the corner, but I also built in my own dice for this!)

Shout out to my son, Noah:   He totally wanted to help out here and used some scrapbook rub ons to number these PLUS he wielded the hot glue gun to put the magnets on the back of the bottle caps.  Thanks buddy!

As for rewards...there are some really cute ideas out there and some sweet rewards cards that so many lovely folks have put together and I love love love them.  However, I'm the kind of gal that likes to ask my peeps what they'd like to earn...so I'll put my reward system together after the start of the school year.
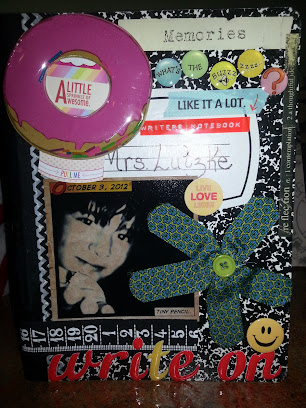
Writers Notebook


And yes...it's time once again to put together a brand new Writers Notebook.  I like to have this ready to go for "Meet Your Teacher Night."  That way, my students can see what they could do to "trick out" their Writers Notebook.  (This also gives parents a great visual so that they can help their honeys put this together!)  

I hand the basic composition notebook out when they walk into our classroom and ask the students to personalize their notebook and bring it back to school with them on the first day.  I can't wait to see what my kiddos bring back with them!

An "Eggcellent" Word Sort


Ok...this is another great idea from another terrific teacher out there.  I know I saw this out there in Blogland but alas...I have no specific person to name.  I've seen this printed out, but I did this one by hand and am not planning on marketing this with cute graphics.  This is just me and I'm just sayin.'

What you can see in the picture:  EGGS!  4 dozen mini eggs to be "eggsact!"  Each egg has two slips of paper in it.  These are word pairs.  For instance, one egg has black and white in it.  The student reads these two words and decides whether it goes into the "Synonym" basket, the "Antonym" basket or the "Homophone" basket.  (Note:  In the photo it's hard to see, but there are 4 baskets.  The first basket is filled with eggs.  The second basket has a "Homophone" mini file folder in it.  The third has a "Synonym" mini file folder and the fourth has an "Antonym" file folder in it.)

The students at this center then decide which basket the egg belongs in.  At the end of the activity, they can check their work against the answer key in the file folder.  (Oh how I love a self-checking learning center!)

I'm leaving this wide open since I can see possibilities for math (primes/composites, factors of even numbers/factors of odd numbers)...

Instead of creating a list of words, I chose words that my third graders might encounter in their reading.  I'd highly recommend personalizing your choices as well.

BTW...all eggs and baskets came from my favorite place:  the Dollar Tree!  I had a few mini file folders laying around, so I added those to the mix.

Word Boxes


I've been working on these a bit and BIG PUFFY HEART LOVE how they turned out!  It's a different take on "Making Big Words" which I adore.  I just don't like the time it takes to cut out all of those squares...even if the kids are doing it.

Anywho...I made 5 boxes in each color so that the entire class can use these in small groups.  If you've never used Making Words or Making Big Words before, it's really quite simple...letters are placed on individual cards so that students can manipulate words and explore "words within words" on their own or in small groups.  There is really one giant word in each box, and the students try to figure out as many small words as they can while working to determine the big word.  My kiddos have journals for this and they love it!

I also put together the first 13 weeks worth of these boxes...I can't wait to use them.

The boxes came from a favorite place of mine:  The Container Store.  Each box meaures 2 x 2 x 3/4" and costs 69 cents.  I bought mine online, but if you are lucky enough to have a Container Store close by, they can be found in the gift wrap aisle.

I picked up 12 x 12" scrapbook paper in coordinating colors and just cut each square into a 1 1/2" ...if you do this, you'll get 64 squares per sheet of paper and you won't have to waste any by punching these out!

I have lots of other things I've worked on and my phone cam isn't cooperating, so I'll just have to wait until next time to share the rest.

Don't forget to share the love with your colleagues...some of these were a little pricey and a little more time consuming, so if you don't want to put these together for everyone, don't sweat it.  Do share when you can!  You'll be glad you did!

Nikki


Thursday, July 18, 2013

Bloglovin!

Finally...I'm on Bloglovin!  And I must say, I'm lovin' it!  Special thanks to Melissa at Common Core and So Much More for her wonderful tutorial on how to change the basic button over to her super-cute button!  I love it!

If you are looking at changing up your Bloglovin' button, I'd highly recommend checking this out:


Hope you are having a wonderful day!  And if you aren't following my blog on Bloglovin', WHAT ARE YOU WAITING FOR?  Get on board already!

Nikki

Monday, July 1, 2013

Monday Made It...Just Ketchin' Up!


Ok...I'll admit it...I haven't been inspired as of late.  But this morning, I took a sneaky peek at all of the great posts out there and I must admit that I was quite inspired to put a seed of an idea into play.

I bought these goofy little ketchup and mustard bottles at the Dollar Tree last summer and thought that maybe these might make an interesting addition to some sort of learning center.  I shelved them for a bit and then ran across them as I was putting my room in order and...well something clicked.  Literally.  I actually felt the lightbulb snap on and so...

These goofy things were born!


It's the FOOTLONG MEASUREMENT STATION!  

I had a feeling that if I put some light string into the bottles and tied the ends that I would get a bottle that "shoots" the string out when it is squeezed.  My little brain tied itself around this idea and it really worked!

HOLY HOT DOG BATMAN!

Here's the scoop as to how to make these babies:


  1. Cut a 15" length of lightweight string.  I used kite string.  (Note:  Kite string can be "colored" using spray ink that you would use in scrapbooking/papercrafting.  I used Heidi Swapp's Cherry Red Spray Ink and October Afternoon's Lemon Drop Sprinkler to get these colors.  They also do a great job coloring hair...in case anyone is interested!)
  2. Tie many many many knots into the end of your string to keep "ketchup" or "mustard" from shooting out of the cap.  
  3. Thread the end of a needle and drop other end of string into the cap and out the top of the nozzle.  
  4. Tie many many many knots into the end of the string that is coming out of the top of the nozzle and fray the ends...for giggles mainly.
  5. Create labels for each of the bottles.  I used "Customary Catsup" and "Metric Mustard."
Note:  While I am a HUGE FAN of funky spellings, I simply cannot endorse spelling words that students need in testing and in other places incorrectly.  That is why I went with "Customary Catsup" instead of "Kustomary Ketchup."  My kids need to see these words spelled correctly.

Your students can use the Customary Catsup to practice their customary measurement and the Metric Mustard to practice their metric measurement.

I also included a spot on the recording sheet to extend students thinking...mean, median and mode.  I may just add range...again...for giggles.  It's great practice either way.


I am always on the lookout for great concept stations that allow students to practice those skills and strategies that are taught at the very end of the year.  In the math series my district uses, that means measurement and probability.  However, our state tests are administered in November, so that means that these concepts usually test a bit low.  MAP testing also has quite a bit of probability and measurement...again...if these concepts aren't covered early on, it's a bust.

So I just thought that I'd put together an engaging (technical meaning:  fun!) way for my third graders to practice their measurement skills.  I've never been a big fan of giving a kid a ruler and then sending them out to measure arbitrary objects or practicing on drawings on a math worksheet...so this little station will fit the bill nicely.

Not only that...it's actually fun!  I tested it on my soon-to-be-seventh-grader and he couldn't keep his hands off of it!  His comment:  "Why don't we get to do cool stuff like this in algebra?"  (That's a challenge, by the way!)

Noah came up with a ton of great game ideas that could be played after completing the center sheet that you'll find here.  My suggestion would be to run this sheet as a 2-sided paper or laminate one of these and use with a Vis-a-Vis marker or dry erase.

As for Noah's game ideas:  why not try to have 2 students "duel" and see who comes closest to 6 inches?  Noah also suggests have students try to come up with the shortest measurement squeeze or the longest. I'm sure there are plenty more where this came from.  If you have any ideas, I'd love to hear them!

Thanks for checking out my blog and this goofy goofy post!  And remember...if you are taking the time to make one of these for yourself, why not take time to make a second for your teaching partner?  (My new third grade partner, Megan, has no idea what's coming her way!)  And while you are at it...make a third for a wonderful teaching buddy...like the Wonderful Linda (my mentor and fourth grade partner!).

This was actually super-cheap and really easy to do...so why not make a few extra?  I'm sure your teaching pals will RELISH the opportunity to use a center like this in their classrooms too!  (Sorry...had to do that!)

Happy Happy Monday!

Nikki